A clogged or partially nozzle is one of the most common issues when diagnosing a failed print. Whether the printer stops extruding completely or it is severely under-extruding, its a sign that you most likely have a clogged nozzle.
Why is My Nozzle Clogging?
There are many causes for a clogged nozzle including dust on the filament, poor filament, using filaments with particulates big enough to clog the nozzle (e.g Marble, Carbon Fiber and Sparkly Filament) and a printer just feeling like clogging. Majority of the time, the blockage is in between the nozzle and the heat-break, where the internal diameter of the hole goes from the diameter of the filament to the diameter of the nozzle.
How to Un-Block the Nozzle
There is a couple of methods to remove a blockage but some are easier and work better than others. In almost every printer kit today there is a small pin that looks like an acupuncture needle. It is given as a means of cleaning the nozzle but we recommend using the method below instead as the needle can possibly damage the nozzle or change the diameter of it.
The cold pull
This is our preferred method at Phaser3D and we find it is the best at completely removing any impurities in the nozzle. We suggest you use a dedicated nozzle cleaning filament but if you’re in a rush, regular PLA will do. The dedicated cleaning filament has a greater temperature range and isn’t as brittle as PLA when you need to pull on it.
Step One: Crank Er’ Up and Load Filament
Crank the nozzle temperature to the maximum it can go, for the E3D V6 hot-end that’s 285°. Once its up to temp, load the filament and force it through. Eventually it should all flow out with lots of little dark speckles. Once all the dark spots are gone, bring the nozzle temperature back down to room temperature whilst continuing to load filament. Some printers might not allow you to load filament below a certain temperature so you will need to remove any extruder tension and manually feed it in until you can’t any more. usually around 170°-180° then leave it.
Step Two: Pull, Pull and Pull
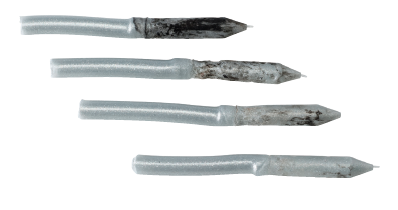
Wait until the nozzle is back to room temperature and then pre-heat again to regular PLA temps. Whilst its pre-heating, wrap your hand around the filament and keep constant tension on the filament. Around 170° the filament will start to release from the walls of the nozzle and keep pulling until the filament comes out. On the tip of the filament you should see that it has lots of little black specs and has conformed to the shape of the nozzle and it has a little point at the tip of it. This is the best sign to know if its been successful or not.
Step Three: Rinse and Repeat or Happy Printing
As seen in the picture above, multiple cold pulls are needed to get the nozzle completely clean. Once the filament you pull out is free of any black spots or other colours, your printer is ready to go back into service 🙂
If you’re still unsure or wanna watch someone else do it first, take a look at how The 3D Printing Nerd does it: https://www.youtube.com/watch?v=MGt8cnVIKW8
We’d love to chat to you about your 3D Printing needs. Get in touch!


can i do cold pull using carbon fiber filled