The Ender 3 has slowly become one of the most popular entry-level 3D printers on the market. This is mainly due to the price point of only $280AUD. Out of the box the print quality is pretty decent for the regular materials like PLA and PETG but it starts to degrade when you try to print more exotic materials like TPU and Nylon. This is primarily caused by the bowden style extruder and the hot-end setup. At Phaser3D, some of our staff have modified their stock Ender 3’s and their prints are comparable to ones coming off our Prusa’s. These are some of the upgrades they’ve done and some tips along the way. All the upgrades mentioned can be performed on any printer, we just like the Ender 3 cause of it’s price point.
Tools and Parts Required for Upgrades:
Many of the tools required for the upgrades a budding 3D printing enthusiast will already own but there are a few specialised tools and components you need to do the job properly.
Crimping Tool and Crimp Connectors: In order to add any of the JST connectors or do the wiring for the TMC2130’s, you’ll need a set of crimps. A cheap set can be found on ebay for only $23AUD! Along with that, you’ll also need some automotive crimps which can be found at any automotive store and some specialised crimp connectors, found here: JST and JST-XH
Wire: One thing you won’t consider is the amount of wire you’ll need, either for extensions or entirely new parts. We recommend silicone wire as it more flexible than standard wire. From power wires to small wires to run the fans you’ll use every gauge from 26AWG all the way up to 12AWG.
Soldering Iron: Whenever a cable needs to be extended or two wires spliced together, soldering them together is the best option. A cheap one can be found at any hardware store and will ensure that no wire comes loose mid-print. There are plenty of guides online to show you how to solder if you don’t have any experience.
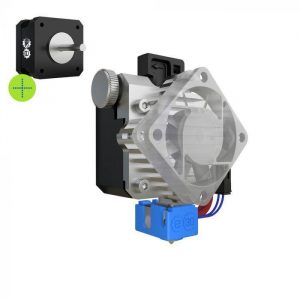
Titan Aero Direct Drive Upgrade:
If we were to suggest just one upgrade to do to your printer to significantly improve the print quality, this would be it. The Titan Aero is a universal direct drive extruder by E3D that you can add to any 3D printer. The conversion from a bowden to direct drive will immediately show vast improvements in print quality, mainly with the amount of stringing and consistency of the extrusion over the entire print. This will also allow you to print flexible materials a lot faster. The print quality is also improved through the use of a 3:1 gear reduction which minimises the resonance of the motor in the print and reduces the load on the motor, leading to a cooler stepper. The Titan Aero pack includes a complete V6 all metal hot end kit meaning all you need to do it mount it, plug it in, adjust some settings and you’re ready to go! As the kit includes the all metal hotend, the maximum temperature is increased from 255° on the stock Ender 3 to 285°, meaning a wider variety of printing materials. When you’re installing it, it will require a 3D printed mount which you can find here (print in either PETG or ABS) and a different part cooling fan, which can be found here.
Here’s a video on installing the Titan Aero.
MKS Gen L Control Board Upgrade:
The MKS Gen L board is an optional upgrade that is necessary if you’re looking to upgrade the stepper drivers and/or have various peripherals like bed-level sensors and filament run out sensors. This upgrade is required if you would like to have all the sensors possible enabled as having all the extra settings enabled like mesh-bed levelling makes the file too big to upload to the original control board and depending on the number of extra sensors, may not have enough ports.
It can run on both 12V and 24V and has space for 5 stepper drivers. It is slightly bigger than the original control board so a new case will need to be printed prior to upgrades; the case can be found here. The one disadvantage is that it doesn’t include an SD card slot, so an external SD card reader would be needed if you don’t want to print via the computer or Octoprint.
Installing this control board will require some custom firmware that can easily be created using the Arduino IDE and Marlin firmware. There are other popular firmware’s but we suggest using Marlin as there are plenty of guides online to help with the process if you’re only starting out.
Here’s a video on installing your MKS board and getting it all configured in Marlin.

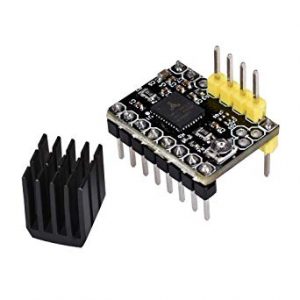
TMC2130 Stepper Drivers:
Now we’re getting into very optional upgrades that will make your whole printer that 10% better. The TMC2130’s are a stepper driver produced by Trinamic and are featured in the Einsy board which is inside a Prusa Mk3. They offer super high precision stepping and are capable of supplying up to 2.5A of current with a heatsink. These are not the reasons you would choose these steppers though, the features we like them for are their StealthChop and StallGuard.
StealthChop is a function designed by Trinamic that reduces the noise produced by the stepper motors without reducing the power of the stepper too much. This makes the overall printing experience better as the noise of a loud 3D printer doesn’t keep you and everyone else in the house awake at night. This is a simple setting that can be turned on or off through Marlin.
StallGuard is what makes the Prusa Mk3 standout. StallGuard allows the printer to self-home without the use of limit switches, called sensor-less homing. It detects a rapid change in current and tells the control board that this is the home position. The sensitivity of this can be tuned to ensure there are no false-positive readings. The installation process for this added feature is a bit time consuming but the end result is totally worth it. If you’re not up for building your own wiring loom there are some you can buy online.
If you’re after the features of the 2130 but can’t afford a full set, just purchase two for the X and Y axis as they’re the main two axis that move the most and then purchase some cheaper ones for the Z and E axis.
If you’ve got the MKS Gen L and don’t want the features of the TMC2130, the A4988 and the DRV8825 are some good alternatives at a cheaper price point.
Here’s a video covering the basic setup of the TMC2130’s and the more advanced sensor-less homing setup.
Other Tips and Tricks:
During maintenance of 3D printers, there’s always things you wish were easier to fix and whilst your upgrading your printer, you may as well upgrade these as well.
Removable Thermistor and Heater Cartridge: Two of things that tend to break during a nozzle change or removal of a failed print stuck to the nozzle are the thermistor and the heater cartridge. With the addition of a small connector like an XT30 or JST connector close to the nozzle, swapping over the part only takes 5 minutes, rather than 15-30 minutes depending on the printer. This also allows for a quick swap system between the standard heater block and the volcano heater block.
External Heat Bed MOSFET: The MOSFET is the device that supplies power to the heat bed and regulates the temperature. Occasionally, the quality or rating of the MOSFET isn’t enough to meet the demand of the heated bed and can fail. So before this happens, add an external MOSFET, similar to this one, which is much bigger that the one on the control board. This puts no load on the MOSFET on the control board meaning you don’t have to replace the entire control board if it were to die.
Upgraded Print Surface: The stock print surface on the Ender 3 isn’t the greatest in terms of adhesion and durability. I swapped mine out for a Prusa PEI spring steel bed that I cut down, but there are new options in terms of removable beds such as the WhamBam build plates. Other options include the borosilicate glass bed made by Creality themselves or going to your local glazier and getting a plain glass bed cut to size. Any of these options increases the adhesion to the bed and produces a much nicer first layer.